
Here are a set of basic instructions that you might need in order to use and do my printable crafts. The crafting part itself is pretty straight-forward, but for the sake of being thorough, I will give step-by-step instructions!
Printing
STEP ONE- Each post will have either a link or a little printer button/link in order for you to access the printable craft. This button will likely be at the bottom, but in some of the older posts, it may be in the center or towards the top of the content. Newer buttons will look like this…. click it!

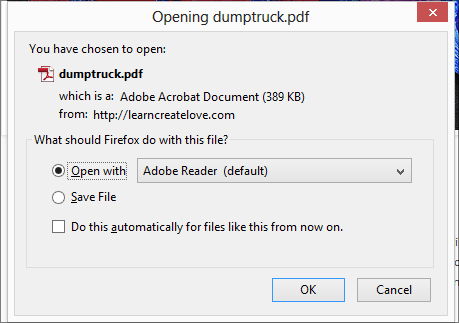
STEP TWO– After clicking the download link, a box should pop up (see image below). Choose “Open With” – Adobe Reader should be the default. You may have to download the (free) app to your computer in order for my printables to be able to open.
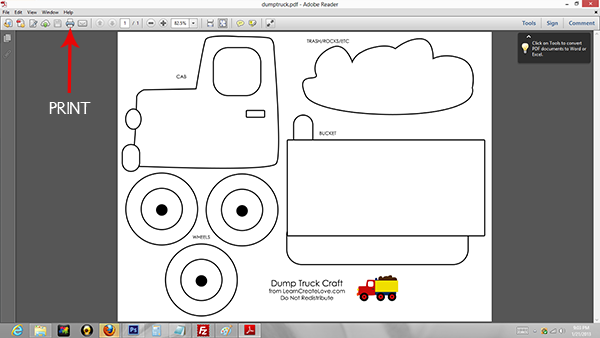
STEP THREE– After the PDF-file printable craft opens, it should look similar to this. Don’t worry if yours is a little different ~ you may have a newer or older version than me. Look for the Print Button and click it.
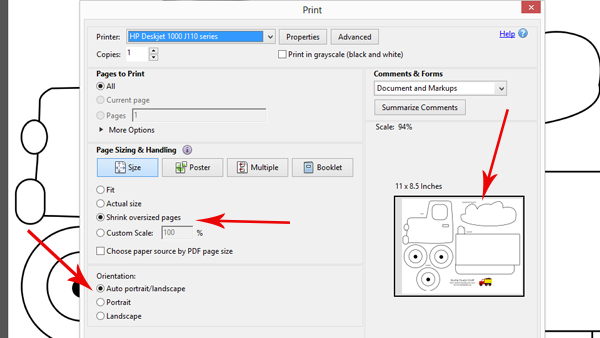
STEP FOUR– The printer settings pop-up should load onto your screen. Take note of the following: that it is set to print to the printer of your choice. Make sure that the size is set to “fit”, “scale”, or “shrink to page”. My printables are high resolution, so if you set it to “actual” then it won’t print correctly! Also, make sure that your orientation settings is set to “auto”, or make sure that it’s either landscape or portrait for each printable. Keep your eye on the little preview box. It will show parts that are cut off – change your settings accordingly. See picture below for reference.
Having Trouble Printing? Click here to troubleshoot!
Please note that all printables belong to LearnCreateLove.com, and by downloading or printing, you are agreeing to my Terms of Use. Please do not redistribute onto your website. Link back to the blog post, not the printable itself.
———————————————————————————
Finished Printing? Good, LET’S CRAFT!
The printables that I make and put up on this site are pretty straight-forward in terms of instructions. However, to be thorough, I’m going to write out step-by-step instructions on how to do these. (Also, this well save me some time while blogging the crafts – instead of writing out the same ol’ instructions time after time, you can come here if you forget (you won’t, lol). Now, while these instructions work for most of the printables, there might be an extra step or so in certain instances – in that case, please read the “tip” added on the craft’s individual blog post.
Materials we use for most printables: Tempera/Craft Paint, Cardstock, Scissors, Glue, Googly Eyes
Step 1: Print the Craft. See Above for Instructions
Step 2: Have your child paint the craft. My daughter is a bit older, so she has no problem with painting different parts certain colors. I give her the option to just free paint whatever but a lot of time she wants the colors to be ‘right’ and look just like the example. Other times, not so much. As long as she’s having fun, I really don’t care. A good tip for those printables where things are kind of close – cut sections like-colored sections first.
Step 3: Allow to dry completely. I don’t take this advice a lot of time, only because I know I’m going to be blogging it and want to get it done and photographed. But it really is easier if you just wait for everything to dry.
Step 4: Cut out all of the pieces & mock-assemble. Doing this will make it easier to figure out where/how to glue everything down.
Step 5: Glue down. We almost always use liquid Elmer’s, but a glue stick will work, too. Whatever floats your boat. 🙂
Step 6: Add any extras, (googly eyes, teeth, etc) and step back and admire.
I’ve been doing these kinds of “Crafts” with Lorelai since she was 18-months-old. I wasn’t making the printables back then, but I was doing it “Eric Carle” style and having her paint with watercolors then cutting it out to make different animals, etc. She LOVED it and was always so proud of her little creations. When she got older and I started making the printables, she really really enjoyed seeing the different parts, painting them, and seeing them come together. Now at 4.5, she’s painting and gluing down all by herself – I will help her adjust some things, but for the most part, she does everything but the cutting (and she’s almost there -eek!).
Anyway, I hope you are able to enjoy some of these printables. They are all FREE to download and use for personal use. If you blog them, please link back to the original blog post (not the link to the printable!) so that your friends can find and use these crafts as well. Do not redistribute the printable on your website – just link back here. Thank you!
